1. 개요
이전 포스트에서 웹소켓과 STOMP 동작 원리에 대해 공부했다. 이제 이를 Spring에서 동작하게 코드를 작성하려고 한다. 흐름은 다음과 같이 구현했다.
- 페이지 이동 : 사용자 개인 달력 페이지로 이동 + userId
- 페이지 로딩 시 웹소켓 연결 : 페이지 이동과 함께 url로 넘겨받은 userId를 이용해 websocket 연결 및 구독(sub) 설정
- 버튼 클릭시 알림 수신 : '예산 알림 받기' 버튼 클릭 시 구독한 사용자와 관련된 알림 수신
- 알림 : 웹소켓으로 수신한 메시지를 bootstrap toast로 띄우기
2. 의존성 추가
웹소켓 연결을 위해 화면까지 구현했기에 view 관련 의존성도 같이 추가했다.
// 웹소켓
implementation 'org.springframework.boot:spring-boot-starter-websocket'
implementation 'org.webjars:stomp-websocket:2.3.3'
implementation 'org.webjars:webjars-locator-core'
implementation 'org.webjars:sockjs-client:1.0.2'

// 화면
developmentOnly 'org.springframework.boot:spring-boot-devtools'
implementation 'org.springframework.boot:spring-boot-starter-thymeleaf'
implementation 'org.webjars:bootstrap:3.3.7'
implementation 'org.webjars:jquery:3.1.1-1'
implementation 'nz.net.ultraq.thymeleaf:thymeleaf-layout-dialect'
3. WebSocketConfig
@Configuration
@EnableWebSocketMessageBroker
@RequiredArgsConstructor
public class WebSocketConfig implements WebSocketMessageBrokerConfigurer {

    private final StompHandler stompHandler; // jwt 토큰 인증 핸들러

    @Override
    public void registerStompEndpoints(StompEndpointRegistry registry) {
        registry.addEndpoint("/ws-stomp") // "/ws-stomp"로 소켓 연결 설정
                .setAllowedOriginPatterns("*") // sockJS 로 웹소켓 연결 시 cors 설정 안되는 문제 해결
                .withSockJS();
    }

    @Override
    public void configureMessageBroker(MessageBrokerRegistry registry) {
        registry.enableSimpleBroker("/sub"); // "/sub" 을 구독하고 있으면 메시지 전송 가능
        registry.setApplicationDestinationPrefixes("/app"); // destination 헤더의 prefix가 /app인 경우
    }

    @Override
    public void configureClientInboundChannel(ChannelRegistration registration) {
        // 토큰 인증을 위해 stompHandler 추가
        // 연결 전에 핸들러 메서드 실행
        registration.interceptors(stompHandler);
    }
}
registerStompEndpoints()
@Override
public void registerStompEndpoints(StompEndpointRegistry registry) {
    registry.addEndpoint("/ws-stomp") // "/ws-stomp"로 소켓 연결 설정
            .setAllowedOriginPatterns("*") // sockJS 로 웹소켓 연결 시 cors 설정 안되는 문제 해결
            .withSockJS();
}- addEndPoint() : 웹소켓의 엔드포인트를 지정한다. 클라이언트에서 해당 경로로 서버와 handshake 하게 된다
- setAllowedOriginPatterns() : 허용할 origin 패턴을 지정할 수 있다(CORS 설정)
- withSockJS() : 브라우저에서 SockJS를 사용한 websocket을 지원하지 않을 때 지원하는 대체 옵션
configureMessageBroker()
@Override
public void configureMessageBroker(MessageBrokerRegistry registry) {
    registry.enableSimpleBroker("/sub"); // "/sub" 을 구독하고 있으면 메시지 전송 가능
    registry.setApplicationDestinationPrefixes("/app"); // destination 헤더의 prefix가 /app인 경우
}- enableSimpleBroker() : 메시지 브로커를 활성화하고, subscribe 메시지 접두사를 설정
- setApplicationDestinationPrefixes() : 클라이언트가 보낸 메시지에 destination 헤더에 해당 prefix("/app")로 시작하는 메시지를 메시지 브로커에서 처리하게 설정
configureClientInboundChannel()
토큰을 가진 로그인에 성공한 유저로 웹소켓을 연결할 것이므로, 토큰을 검증하는 로직이 필요하다.
@Override
public void configureClientInboundChannel(ChannelRegistration registration) {
    // 토큰 인증을 위해 stompHandler 추가
    // 연결 전에 핸들러 메서드 실행
    registration.interceptors(stompHandler);
}
StompHandler
위의 configureClientboundChannel() 메서드 내부에서 사용하는 stompHandler의 코드이다.
preSend() 메서드를 오버라이딩해서 CONNECT하는 상황인 경우, 토큰을 검증해줘야 한다. 토큰의 유효성을 검증한 후, 유효하지 않다면 커스텀 예외(AccountBookException)가 발생하게 하였다.
@RequiredArgsConstructor
@Component
public class StompHandler implements ChannelInterceptor {
    private final JwtTokenProvider jwtTokenProvider;

    @Override
    public Message<?> preSend(Message<?> message, MessageChannel channel) {
        StompHeaderAccessor accessor = StompHeaderAccessor.wrap(message);
        if (accessor.getCommand() == StompCommand.CONNECT) { // CONNECT 인 상황에서 토큰 검증
            if (!jwtTokenProvider.isValidateToken(accessor.getFirstNativeHeader("token"))) {
                throw new AccountBookException("", ErrorCode.VALIDATION_EXCEPTION); // 유효하지 않은 토큰에서 예외 발생
            }
        }
        return message;
    }
}
4. AlarmController
클라이언트로부터 전달받은 메시지를 처리하는 클래스이다.
@Controller
@RequiredArgsConstructor
public class AlarmController {

    private final SimpMessageSendingOperations messagingTemplate;
    private final AlarmService alarmService;

    @MessageMapping("/v1/budget/alarm/{memberId}")
    public void sendNotification(@DestinationVariable("memberId") Long memberId) {
        SendBudgetAlarmDto dto = alarmService.sendBudgetAlarm(memberId);
        messagingTemplate.convertAndSend("/sub/" + memberId, dto); // 구독한 곳으로 객체 전송
    }
}
SimpMessageSendingOperations 인터페이스
간단한 메시징 프로토콜(예: STOMP)에 대한 Spring Framework 지원과 함께 사용하기 위한 메서드가 포함된 MessageSendingOperations의 specialization이다.
@MessageMapping
클라이언트가 보낸 메시지의 경로를 매핑해주는 어노테이션이다. 이 프로젝트에서는 memberId를 포함한 "/v1/budget/alarm/{memberId}" 경로로 메시지를 수신한 경우 sendNotification() 메서드를 실행하는 로직으로 진행된다.
@DestinationVariable
@PathVariable과 비슷한 어노테이션이다. HTTP method 매핑 시 parameter 값을 가져오기 위해 @PathVariable을 사용하는 것처럼, 메시지에서 매핑된 경로의 parameter를 가져오는 역할을 한다.
messagingTemplate.converAndSend(D destination, Object payload)
위의 WebSocketConfigure에서 설정한 엔드포인트(/ws-stomp)로 소켓 연결되면, 파라미터 destination(/sub/{memberId})으로 구독할 것이다. payload에는 alarmService에서 반환된 dto(메시지 내용이 담겨있다)를 넘겨준다.
5. View
view에서 웹소켓 관련된 코드는 다음과 같다. 설명을 위해 일부분 생략했기에 전체 코드는 깃허브 링크에서 확인할 수 있다.
header.html
타임리프 레이아웃을 적용했기에 헤더 파일을 따로 만들어 두었는데, 구체적인 코드는 다음과 같다.
<!DOCTYPE html>
<html xmlns:th="http://www.thymeleaf.org">
<th:block th:fragment="headerFragment">
    <head>
        <meta http-equiv="Content-Type" content="text/event-stream; charset=utf-8"/>
        <title>AccountBook</title>

        <link href="/static/css/index.css" rel="stylesheet">
        <script src="/static/js/index.js" type="text/javascript"></script>

        <!--아래 순서가 중요하다-->
        <script src="/webjars/jquery/jquery.min.js"></script>
        <script src="https://cdnjs.cloudflare.com/ajax/libs/popper.js/1.14.7/umd/popper.min.js"></script>
        <link href="https://cdn.jsdelivr.net/npm/bootstrap@5.0.2/dist/css/bootstrap.min.css" rel="stylesheet">
        <script src="https://cdn.jsdelivr.net/npm/bootstrap@5.0.2/dist/js/bootstrap.bundle.min.js"></script>

        <script src="/webjars/sockjs-client/sockjs.min.js"></script>
        <script src="/webjars/stomp-websocket/stomp.min.js"></script>
    </head>
</th:block>
</html>
my-accountbook.html
<!DOCTYPE html>
<html xmlns:th="http://www.thymeleaf.org"
      xmlns:layout="http://www.ultraq.net.nz/thymeleaf/layout"
      layout:decorate="layout/default_layout">
<th:block layout:fragment="content">

<script>
    $(document).ready(function () {
        getMemberId();
    });
</script>

<div id="top" class="container text-center">
    <div class="row">
        <div class="col-2"><a href="/index">AccountBook</a></div>
        <div class="col-8">My AccountBook</div>
        <div class="col-2"><button class="btn btn-light" id="my-page" onclick="redirectMemberId('/my-page/');">마이페이지</button></div>
    </div>
</div>

<div id="middle" class="container text-center" style="padding-top:50px;">
    <div class="row">
        <div class="col align-self-start">
            <div class="row">
                <div class="col-auto"><button class="btn btn-light nav-btn-prev" onclick="goPrev();"><</button></div>
                <div id="year-month" class="col-auto"></div>
                <div class="col-auto"><button class="btn btn-light nav-btn-next" onclick="goNext();">></button></div>
            </div>
        </div>
            <div class="col align-self-end"><button type="button" class="btn btn-success" id="budgetToastBtn" onclick="getAlarm();">예산 알림 받기</button></div>
    </div>
</div>

<div class="calendar">
    <div class="days">
        <div class="day">MON</div>
        <div class="day">TUE</div>
        <div class="day">WED</div>
        <div class="day">THU</div>
        <div class="day">FRI</div>
        <div class="day">SAT</div>
        <div class="day">SUN</div>
    </div>
    <div class="dates"></div>
</div>

<!--예산 알림 토스트-->
<div class="position-fixed top-0 end-0 p-3" style="z-index: 11">
    <div id="budgetToast" class="toast hide" role="alert" aria-live="assertive" aria-atomic="true">
        <div class="toast-header">
            <strong class="me-auto"></strong>
            <button type="button" class="btn-close" data-bs-dismiss="toast" aria-label="Close"></button>
        </div>
        <div class="toast-body"></div>
    </div>
</div>

</body>
<script>
    var memberNumber = window.location.pathname.split('/')[2]; // 웹소켓 전용 회원id, 식별을 위해 number로 명명
    $(document).ready(function() {
        // 웹소켓 연결하기
        connectWebSocket(memberNumber);
    });

    function connectWebSocket(memberNumber) {
        const socket = new SockJS('http://localhost:8080/ws-stomp');
        stompClient = Stomp.over(socket);
        var accessToken = document.cookie.split('access_token=')[1];
        stompClient.connect({"token" : accessToken},
                             function (frame) {
                                 stompClient.subscribe('/sub/' + memberNumber, function (response) {

                                 // 수신한 메시지에 토스트 띄우기
                                 document.querySelector('.me-auto').innerHTML = thisMonth + "월 예산알림";
                                 document.querySelector('.toast-body').innerHTML = JSON.parse(response.body).message;
                                 $('.toast').toast('show');
                             });
                        });
    }

    function getAlarm() {
        stompClient.send("/app/v1/budget/alarm/" + memberNumber, {}, {});
    }

</script>
</th:block>
</html>
페이지 로딩시 connectWebSocket()으로 웹소켓 연결하기
<script>
    var memberNumber = window.location.pathname.split('/')[2]; // 웹소켓 전용 회원id, 식별을 위해 number로 명명
    $(document).ready(function() {
        // 웹소켓 연결하기
        connectWebSocket(memberNumber);
    });
</script>
connectWebSocket() - 클라이언트에서 웹소켓 요청하는 함수
<script>
    function connectWebSocket(memberNumber) {
        const socket = new SockJS('http://localhost:8080/ws-stomp');
        stompClient = Stomp.over(socket);
        var accessToken = document.cookie.split('access_token=')[1];
        stompClient.connect({"token" : accessToken},
                             function (frame) {
                                 stompClient.subscribe('/sub/' + memberNumber, function (response) {

                                 // 수신한 메시지에 토스트 띄우기
                                 document.querySelector('.me-auto').innerHTML = thisMonth + "월 예산알림";
                                 document.querySelector('.toast-body').innerHTML = JSON.parse(response.body).message;
                                 $('.toast').toast('show');
                             });
                        });
    }
</script>
서버에서 설정한 url로 SockJS 인스턴스를 만든 후, access token과 함께 connect() 함수를 실행해 웹소켓을 연결하고, 의도한 경로(/sub/{memberNumber})를 구독한다.
메시지 수신이 성공적이라면 해당 내용을 토스트로 띄운다.
6. 브라우저에서 확인
이제 위에서 설정한 웹소켓이 의도한 대로 움직이는지 브라우저에서 확인해보자.
웹소켓 연결 및 구독
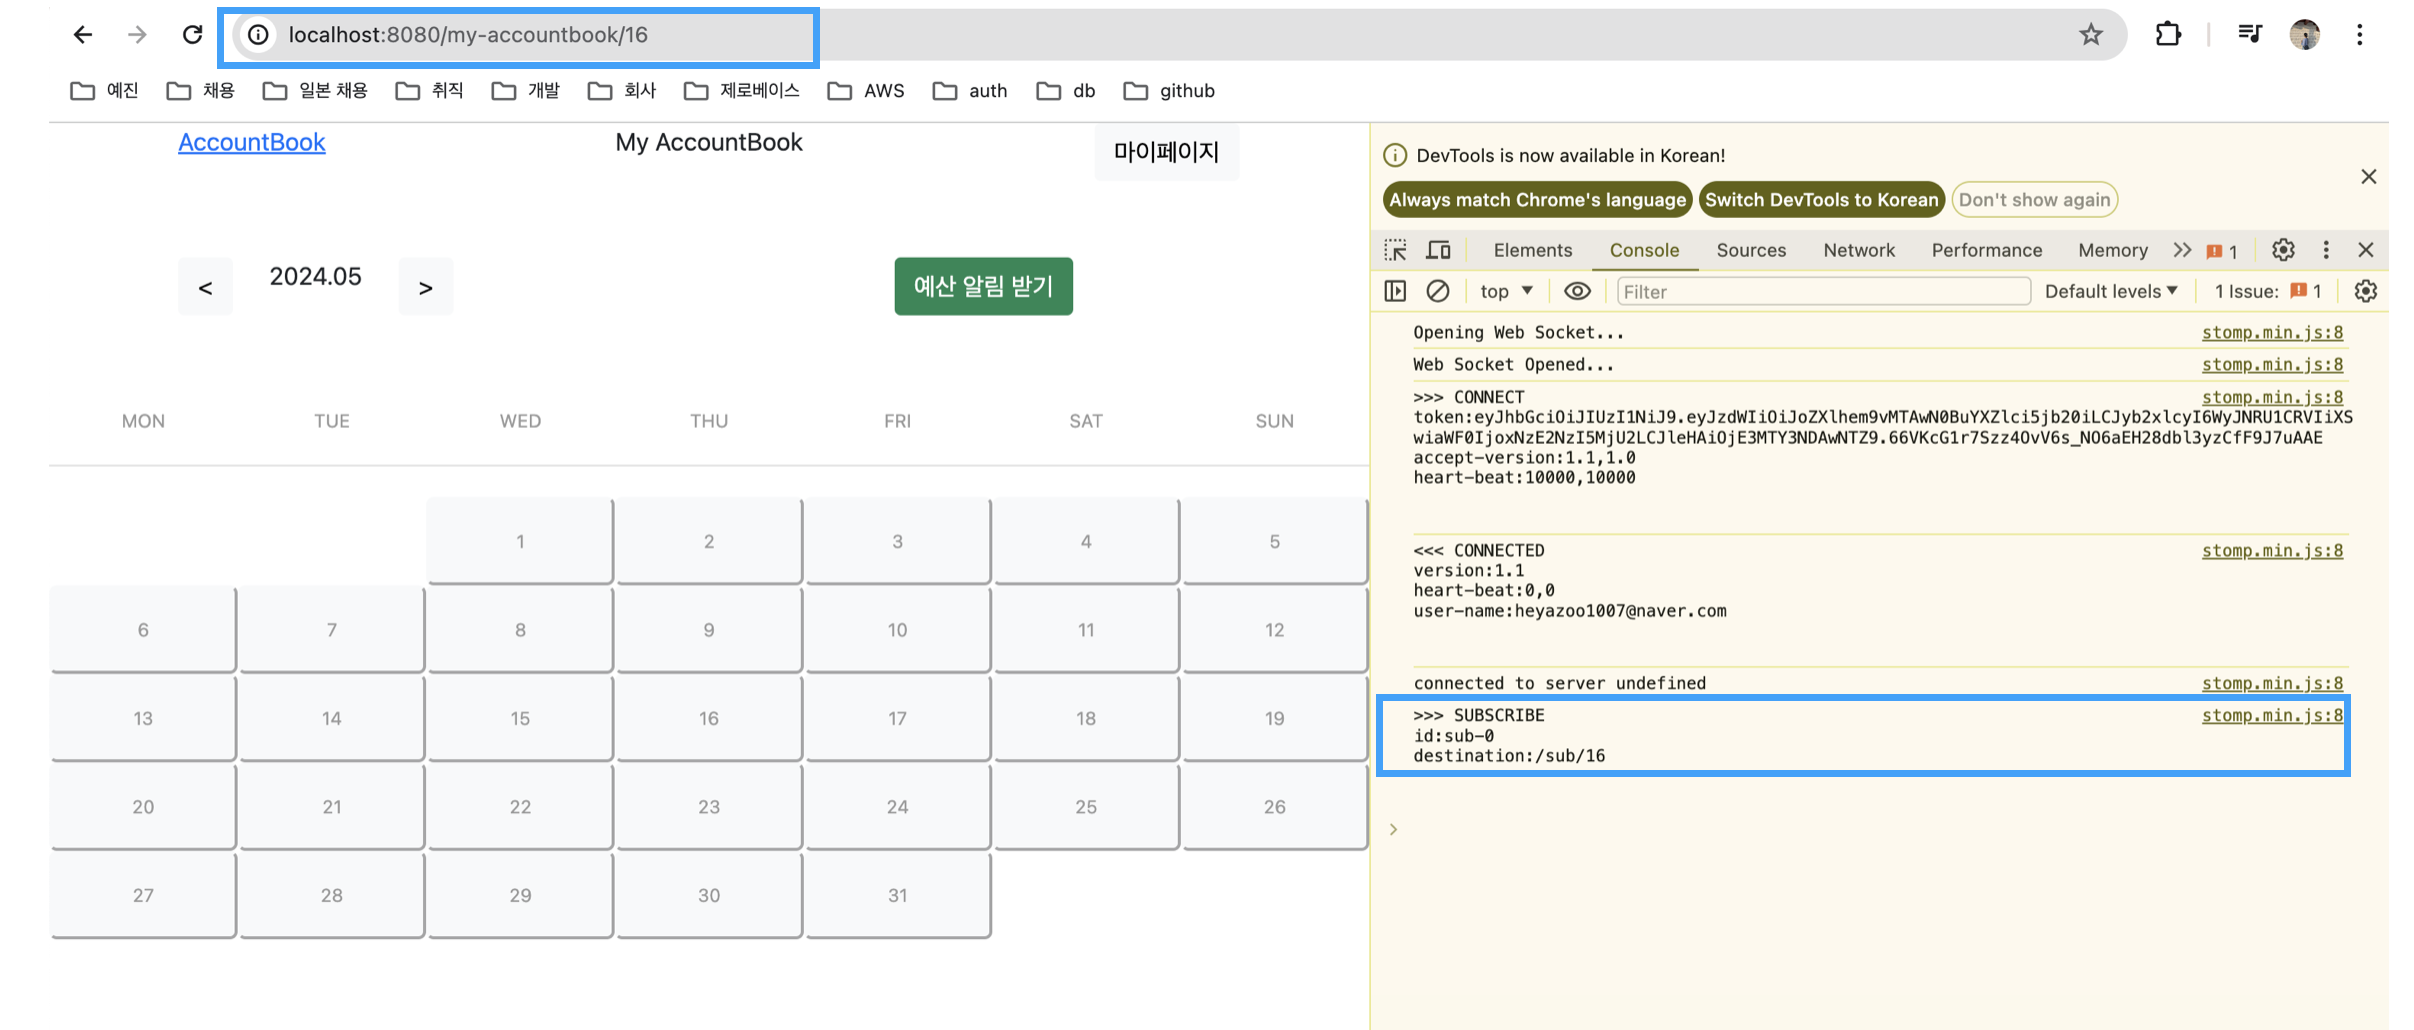
사용자 화면에 이동하면서 url에 넘긴 16(memberId)로 destination에 /sub/16으로 subscribe한 것을 확인할 수 있다.
메시지 수신 후 토스트로 띄우기
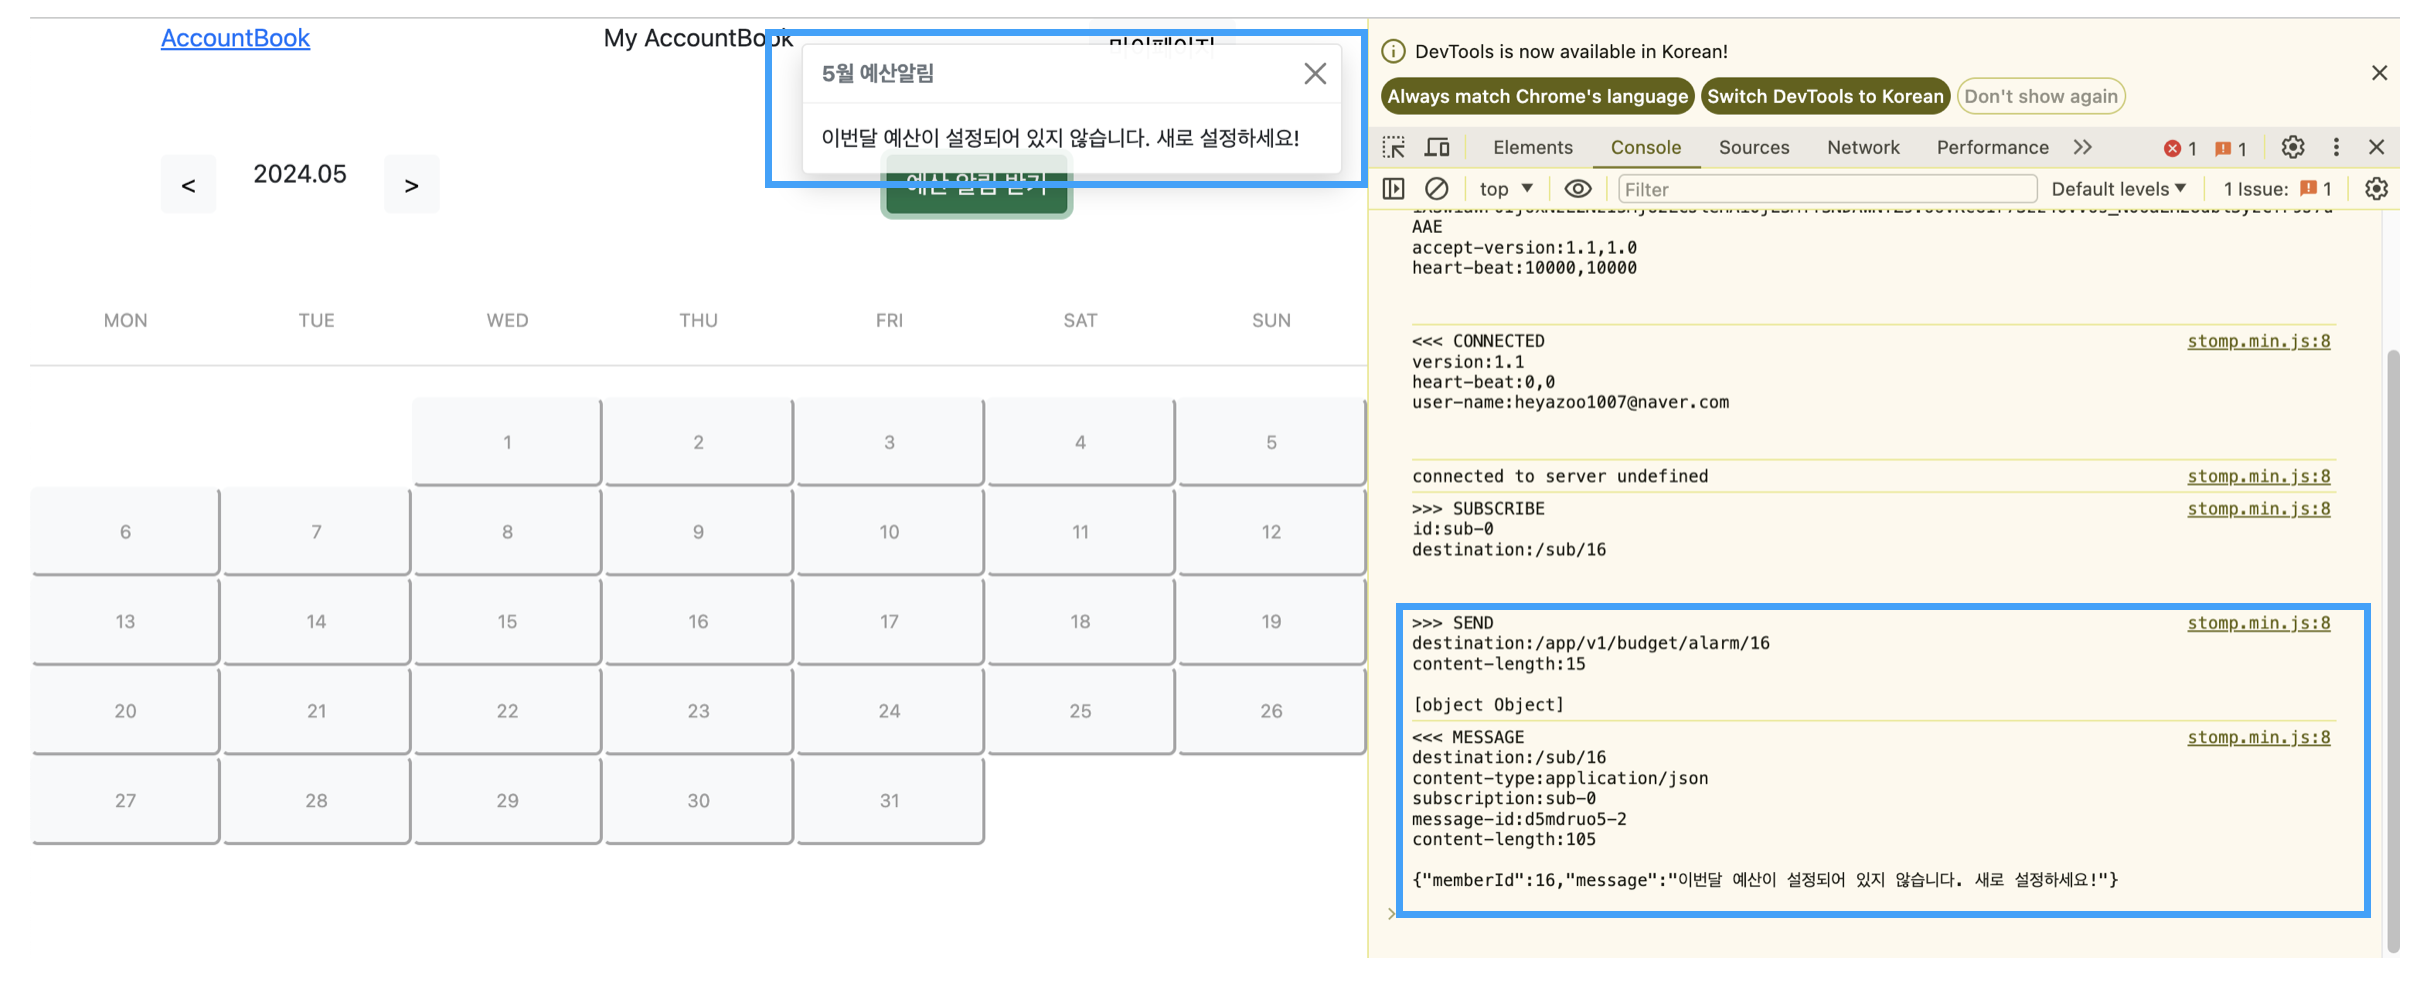
'예산 알림 받기' 버튼을 클릭하면서 getAlarm() 함수가 실행되면서 생성된 메시지가 구독한 /sub/16으로 성공적으로 수신된 것을 확인할 수 있다. 또한 수신한 메시지를 토스트로 띄어지는 것까지 확인할 수 있다.
참고
- https://kukekyakya.tistory.com/12
- https://nobase2dev.tistory.com/25
- https://www.4te.co.kr/881
- https://velog.io/@kmh916/Spring-Boot-%EC%B1%84%ED%8C%85-%EA%B5%AC%ED%98%84SockJSStomp-1.-%EA%B8%B0%EB%B3%B8-%EB%8F%99%EC%9E%91-%EA%B5%AC%ED%98%84
- https://docs.spring.io/spring-framework/docs/4.0.0.M1_to_4.2.0.M2/Spring%20Framework%204.2.0.M2/org/springframework/messaging/simp/SimpMessageSendingOperations.html
'개인프로젝트' 카테고리의 다른 글
| [개인 프로젝트] 가계부 프로젝트 step 4.1 : Spring Security, JWT 토큰, Cookie로 로그인 기능 구현하기 (0) | 2024.05.16 |
|---|---|
| [개인 프로젝트] 가계부 프로젝트 step 3.5 : css, javascript로 동적 달력 만들기 (0) | 2024.05.14 |
| [개인 프로젝트] 가계부 프로젝트 step3.4 - Thymeleaf로 수정 화면 만들기 (0) | 2024.05.12 |
| [개인프로젝트] 가계부 프로젝트 step 3.3 - SpringBoot에서 ajax로 통신하기 (0) | 2024.05.11 |
| [개인프로젝트] 가계부 프로젝트 step3.2 : intellij에서 정적 파일 빠르게 reload하기 (4) | 2024.05.09 |